This luscious mix of rich acidic berries will leave your hair both conditioned and with rich gloss.
1. Mash eight strawberries with one tablespoon mayonnaise;
2. Massage into washed, damp hair;
3. Cover with a shower cap, then a warm towel;
4. Wash out with a shampoo/conditioner combination.
Homemade Yogurt Hair MaskFor dry, frizzed out hair, this recipe will bring back the moisture, leaving your hair silky and manageable.
Ingredients:• 1 egg white (natural moisturizer)
• 6 tbsp natural yogurt
• 1/4 cup mayonnaise (a great conditioner for dry hair).
Directions:1. Beat 1 egg white until foamy;
2. Add 6 tablespoons of plain natural yogurt; and mayonnaise
3. Apply to wet hair in small sections at a time;
4. Cover with plastic shower cap or plastic wrap.
5. Leave in for 30 minutes, then wash out with a mild shampoo.
6. Rinse with very cold water.
7. Use monthly to moisturize hair.
Homemade Honey & Olive Oil Hair MaskFor Extra Shiny Hair and Natural Hair Smoothers.
Ingredients:• 1/2 cup honey
• 3 tbsp olive oil (deep conditioner)
Directions:1. Mix 1/2 cup honey and 3 tablespoons olive oil;
2. Work a small amount at a time through hair until coated;
3. Cover hair with a shower cap;
4. Leave on 30 minutes;
5. Shampoo well and rinse.
Homemade Fruit Smoothie Hair Mask Dry-Hair Mask : slather your hair in this rich mask to bring back its luster.
Ingredients:• 1/2 Banana (potassium softens hair shaft)
• 1/4 Avocado (naturally rich moisturizer)
• 1/4 Cantaloupe
• 1 tbsp Wheat germ oil
• 1 tbsp Yogurt
• 1 Vitamin E capsule (optional)
• 2 Tbsp honey (natural moisturizer)
• 3 Tbsp buttermilk (strengthens hair follicles)
Directions:1. Blend 1/2 a banana, 1/4 avocado, 1/4 cantaloupe, 1 tablespoon wheat germ oil and 1 tablespoon yogurt;
2. For extra conditioning, squeeze in the contents of a vitamin E capsule; honey, and buttermilk
3. Apply to hair from roots to tips.
4. Leave in hair for 15 minutes.
5. Rinse.
6. Use twice a month to maintain healthy hair.
Avocado Rosemary Hair Masks :Ingredients:• one avocado
• fresh organic rosemary.
• Break open a vitamin E capsule
• olive (for extra dry or thick hair)
• a lighter oil (like almond or apricot)
• four drops of tea tree two drops of peppermint essential oil.
• four drops of orange essential oil
• two drops of peppermint essential oil.
Directions:1. Smash up one avocado with fresh organic rosemary.
2. Break open a vitamin E capsule and mix that in.
3. Add a splash of olive oil for extra dry or thick hair or add a splash of a lighter oil (like almond or apricot) for thinner, less dry hair. Don’t add too much oil, or you’ll get a conditioner, not a masque. The texture should be sticky and thick not runny.
4. Drop in four drops each of tea tree and orange essential oil and two drops of peppermint essential oil.
5. Apply to your hair and let it sit for 30 minutes or so. You could wear a shower cap - but I don’t believe in using them. I just clip my hair up in a twist - it works fine and never drips. Rinse out well in cool water for shiner less fizzy hair.
Cucumber & Yogurt Hair Masks :Note: This masque is drippy, other than adding some base like flour (don’t do that) I have no idea how to thicken it up. So, you may want to take a nice bath as you let this soak into your hair.
Cucumber is also known to fight off chlorine damage well if used weekly.
Ingredients:• 1/2 cup organic plain yogurt
• 1/2 of an average sized peeled cucumber
• a tablespoon of honey
• a few drops of lavender essential oil
• a few drops of chamomile
Directions:1. Mix in a blender: 1/2 cup organic plain yogurt, 1/2 of an average sized peeled cucumber, a tablespoon or so of honey, a few drops of lavender essential oil, and chamomile. You have some different choices regarding the chamomile. You can chop fresh really fine, boil fresh to a reduction, or add some essential oil of chamomile. I usually have added the oil, or shopped fresh. Boiling is too much extra work.
2. Apply to your head, clip hair up and soak in the tub for 30 minutes.
3. Rinse in cool water for softer, smoother hair.
Homemade Cucumber Hair MaskAs the weather gets colder, you may find your hair becoming brittle and dull. To return the lustrous shine to your locks, use a homemade hair mask. Try this Cucumber to revive your beautiful hair this season.
Ingredients:• 1 egg
• 1 eggshell's worth of olive oil
• 1 quarter of a peeled cucumber
Directions:1. Blend the egg, olive oil and peeled cucumber.
2. Spread evenly through your hair, leave on for 10 minutes, then thoroughly rinse.
3. For the best results year-round, continue this treatment monthly.
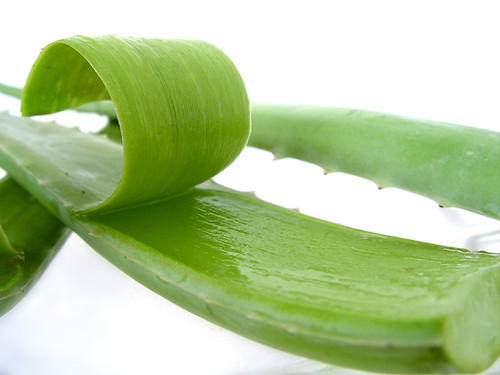
Homemade Aloevera Hair Masks
Take the case of split ends in the hair, for instance. You just can’t ignore it and leave it to its fate. If left untreated, it leads to poor hair-growth and hair-loss. So make an effort to get rid of split ends with alacrity.
Aloe-vera, the natural healer is a fantastic herb; it is not just good your skin but for your hair as well. Even Cleopatra was believed to have rated it highly as a beauty therapy herb.
Aloe Gels are used to bring shine and smoothness in the hair.
Frizz Control for Curly Hair.
Ingredients:• 4 big leaves of aloevera
• 250 grams of coconut oil
Directions:1. Aloe leaves are thick, succulent and have a transparent pulp. Slit open the leaf and scrape out the juicy pulp.
2. Use a liquidizer and blend to make it into a smooth paste.
3. Heat coconut oil in a wok and add the aloe pulp. Keep stirring until the oil floats on the top. Strain the oil and bottle it.
4. Take two tablespoons of oil and massage it well into the scalp.
5. your way from the ends of hair to your scalp, see to it that the ends are properly nourished with oil.
6. Leave on for one hour at least.
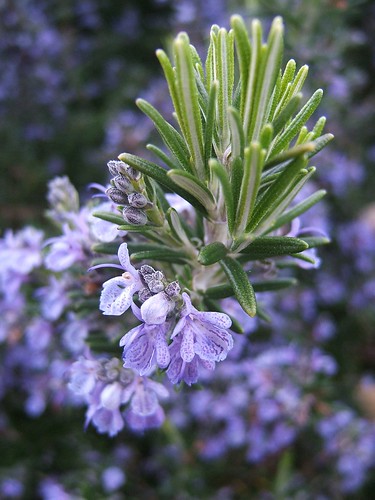
Homemade Anti-Dandruff Hair Mask A. Rosemary
 Ingredients:
• 1 handful Rosemary Leaves
• 1 litre water
• 2 tsp.Vinegar
Directions:
1. Boil the water and soak rosemary leaves in it.
2. Let it stand for one night.
3. Strain and add vinegar to it.
4. After shampooing, wash your hair with this preparation. It treats the hair very fast.
B. Sesame Oil and BhailavanIngredients:
• 1 tbsp Sesame Oil
• 3 tbsp Bhailavan
Directions:
1. Blend the two together and apply it on the head.
2. Leave it on for 2-3 hours
3. Wash it off with a shampoo in lukewarm water.
C. GingerIngredients:
• Ginger root
• 1 teaspoon sesame oil
• 1 teaspoon lemon juice
Directions:
1. Squeeze ginger root through press to obtain one tablespoon of juice.
2. Mix all ingredients.
3. Apply to scalp and let dry before shampooing.
4. Repeat three times a week.
Coconut Conditioning Cuticles MaskI still dream of the coconut oil head massages I took from old men and women in Indonesia in trade for some rupiah and a smile. Coconut keeps the dandruff away and this mask helps the kiddies avoid the mid-year lice breakout.
Coconut oil application also helps with dandruff problems too and hence much preferable to other strong medicated shampoos.
Ingredients:
• Pressed coconut oil
• Towel that is still hot, straight from the dryer
Directions:
1. Take a large chunk of coconut cream and,
2. massage it into your hair.
3. From the dryer, take out a warm towel and wrap it around your head,
4. leaving it for an hour.
5. Wash out the coconut with shampoo and a deep conditioner.


 Looks best where the skin towards the corner of the eye is not sagging such as on younger women because their skin is still firm.
 Use when your brow bone markedly curves around the eye and don't use the winged style because it will make any sag more obvious.


